 <af:validateDateTimeRange minimum="#{bindings.PurchasedDate.inputValue}"
 maximum="#{bindings.ExpiryDate.inputValue}"
 messageDetailNotInRange="Enter your message here"/>
Tuesday, September 12, 2017
How to add a Date Validation in ADF
When imputing dates for Purchasing and Expiry there need to be a validation. That is the Expiry date must be always grater than the Purchased date. Using the following code in the .jsff code you can have the date validation.
Tuesday, August 22, 2017
ADF how to deploy an application
Creating an EAR
First you must change the connection type of the database into "JDBC Data Source" from
"JDBC URL" in the configurations of "AppModule".
Then right click on the Application drop down and select Application properties.
Then expand Deployment and you'll find "Weblogic", select it. Then uncheck the box "Auto Generate and Synchronize weblogic-jdbc.xml Descriptors During Deployment" and click "OK".
Then expand Run and you'll find "Weblogic", select it. Then select "Fast Swap"and click "OK"
Then expand Deployment and you'll find "Weblogic", select it. Then uncheck the box "Auto Generate and Synchronize weblogic-jdbc.xml Descriptors During Deployment" and click "OK".
Then expand Run and you'll find "Weblogic", select it. Then select "Fast Swap"and click "OK"
Then right click on the Model in project tabs and select Deploy and wait until deployment is over
then click "Application" tab and select deploy and in the popup select "Deploy to EAR" and select "OK" then wait until the deployment is over.
Go to the resource folder where your application is initially saved, there you can find a new folder named "deploy" is created, inside that you can find the EAR you created
Wednesday, February 22, 2017
Java ADF creating EO and VO
After creating a Data Base connection,

 |
| Click the 'Applications Window options' and change the Package level to '1' |
 |
| Right click on Test Modal and create a new 'Entity Object' |
 |
| Click 'OK' |
 |
| Give a name to the entity object |
 |
| Type Testmodel.eo for the package name. This creates a package named eo inside the package Testmodel. Then click 'Browse' following to Schema Object |
 |
| You can choose the data base you connected earlier from the Database schema list Then click Query and select the required table and double click then press 'OK' |
 |
| Click 'Next' |
 |
| Click 'Next' |
 |
| Select the attribute for the primary key and tick the Primary key check box and click 'Next' |
 |
| Click ' Next' |
 |
| Click 'Next' |
 |
| Click 'Finish' |

 |
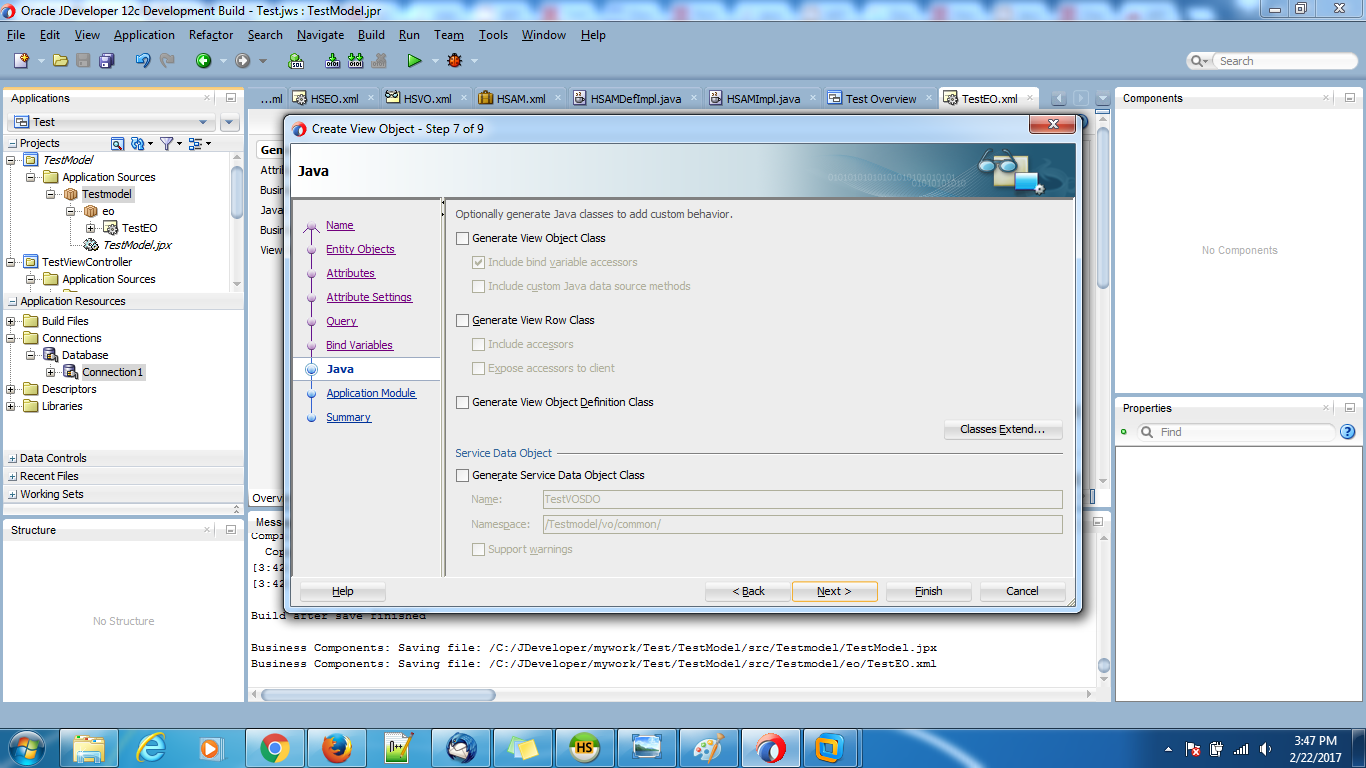
| Right click on Test Modal and create a new 'View Object' |
 |
| Give a name to the view object and type Testmodel.vo for the package name. This creates a package named vo inside the package Testmodel. Then click 'Next' |
 |
| Double click 'TestEO' to select it |
 |
| Click 'Next' |
 |
| Double click the data base table fields to select them |
 |
| Click 'Next' |
 |
| Click 'Next' |
 |
| Double click to select |
 |
| Click 'Next' |
 |
| Click 'Next' |
 |
| Click 'Next' |
 |
| Click 'Next' |
 |
| Click 'Finish' |
 |
| Creating EO and VO is complete |
Monday, February 20, 2017
Java ADF connecting to a Data Base
When you open Oracle JDeveloper Studio you will be prompted to the following screen
 |
| Select Connect to a Data Base |
 |
| Select 'Create a Data Base Connection' |
 |
| Give a name to your connection |
 |
| Select the connection type you use. Here we are using a MySql Data Base |
 |
| Type the username and the password and give the Data Base name. Then test the connection and press 'Ok' , if the connection is unsuccessful check the username, password and the Data Base name |
 |
| Click the not started button and change it to 'Done' |
Sunday, February 19, 2017
Simple Calculator using java
Calculator with user input (Using scaner)
Class = Cal
 import java.util.Scanner;
 public class Cal {
      public static void main(String[] args) {
           temp();
      }
      public static void oparator(int x, int y,String oparator) {
           if("ADD".equals(oparator.toUpperCase())){
                int z = x + y;
                System.out.println(z);
           }
           else if("SUB".equals(oparator.toUpperCase())) {
                int h = x - y;
           System.out.println(h);
           }
           else if("DIV".equals(oparator.toUpperCase())) {
                int i = x / y;
           System.out.println(i);
           }
           else if("REM".equals(oparator.toUpperCase())) {
                int j = x % y;
           System.out.println(j);
           }
           else if("MUL".equals(oparator.toUpperCase())) {
                int k = x * y;
           System.out.println(k);
           }
      }
      public static void temp(){
          Scanner sc=new Scanner(System.in);
          System.out.println("Seclect the Oparator");
          String oparator=sc.nextLine();
          System.out.println("Enter a first number: ");
          int FirstNumber=sc.nextInt();
          System.out.println("Enter a Second number: ");
          int secondNumber=sc.nextInt();
          oparator(FirstNumber,secondNumber,oparator);
          temp();
      }
 }
You can add more operators
Operator
|
Description
|
+ (Addition)
|
Adds
values on either side of the operator.
|
- (Subtraction)
|
Subtracts
right-hand operand from left-hand operand.
|
* (Multiplication)
|
Multiplies
values on either side of the operator.
|
/ (Division)
|
Divides
left-hand operand by right-hand operand.
|
% (Modulus)
|
Divides
left-hand operand by right-hand operand and returns remainder.
|
++ (Increment)
|
Increases
the value of operand by 1.
|
-- (Decrement)
|
Decreases
the value of operand by 1.
|
Calculator without user input
 public class cal{
      public static void main (String args[]){
           int x = 5 ;
           int y = 6 ;
           System.out.println("x + y =" + (x+y));
           System.out.println("x - y =" + (x-y));
           System.out.println("x / y =" + (x/y));
           System.out.println("x * y =" + (x*y));
           System.out.println("x % y =" + (x%y));
      }
 }
Sketch
You can change the data printed in green
public
class cal{
public static void main (String
args[]){
int x = 5 ;
int y = 6 ;
System.out.println("x
+ y =" + (x+y));
System.out.println("x
- y =" + (x-y));
System.out.println("x
/ y =" + (x/y));
System.out.println("x
* y =" + (x*y));
System.out.println("x
% y =" + (x%y));
}
}
Saturday, February 18, 2017
Creating "Hello World" java program
Example
Class = Simple
 class Simple{
      public static void main (String args[]){
           System.out.println("Hello World");
      }
 }
Sketch
Copy the following java codes and replace data printed in green. Then run the java program.
class Simple{
public
static void main (String args[]){
System.out.println("Hello World");
}
}


How to compile and run the above program using command prompt
Copy the
above sketch into the notepad and save it with the extension .java instead of .txt
Then
open the command prompt and type,
cd
C:\Users\Inova\Desktop\new\Hello world
here
(C:\Users\Inova\Desktop\new\Hello world) is the path of the folder in which the
java file that you created before is saved.
Then
type,
javac Simple.java
and
enter. by typing 'javac' we compile the java file. A new file called CLASS file
will be created. Here 'Simple' is the name which the Java file is saved.
Then
type,
java Simple
and
enter. Then the compiled java file will run, giving the output "Hello
World".
 |
| Copy and paste the above sketch on the note pad |
 |
| Save with the extension .java insted of .txt. Also change the Save as type to All Files |
 |
| Text file is saved as a java file |
 |
| Copy the path of the folder. |
 |
| Open the command prompt |
 |
| Type "cd C:\Users\Inova\Desktop\new\Hello world" and press enter. (cd <space> <copied path> ) |

 |
| Type "javac Simple.java" and press enter. Here the java file compiles and creates a CLASS file. |
 |
| The CLASS file also saves in the same folder |

 |
| Type java Simple and enter |
 |
| Output : "Hello World" |
Friday, February 17, 2017
Java path setting
 |
| Right click on Computer icon and click properties |
 |
| Select Advanced system settings |
 |
| Click Environment variables.. |
 |
| Click New |
 |
| Add 'path' as the variable name |
 |
| Computer - Local Disk (C) - Program files - java - jdk1.8.0_111 - bin Copy the address |
 |
| Then click 'Ok' |
Path setting is complete
Subscribe to:
Comments (Atom)